Starting Out: Equipment
Gearing Up for Learning
As one of my mentors likes to tell beginners, there’s a difference between the best gear for learning this craft and that for producing astrophotographs. Mind you, my “learning” rig has produced some of my best images and is still very much in use. Other nights I use longer scopes, a fancier imaging train, and more gadgetry. But when you’re starting out, simple is better.
Milky Way and Night Landscapes
For landscapes and Milky Way imaging, a cell phone with a “pro” mode that can produce RAW images is a great start, especially if you have a way to hold it steady (tripod, suction cup, beanbag). A camera with a fast-aperture lens (f/2.8 or better) is great; interchangeable lenses are better, and a fixed-focal-length lens (i.e. “prime”) is best. Megapixels, so touted on bullet lists, are much less important than noise performance, which is related to pixel size. Think “bigger sensor with fewer pixels”. My ancient 14-MP Pentax K-5iis has whacking huge 4.76𝛍 pixels that really squash the noise. Almost all of my “Landscape” gallery was shot with that or my even older K-7. Automation, bah! Autofocus and autoexposure almost never work for astro. So simpler, older lenses work quite well (most of mine are from the 1980s).
Smart Telescopes
All-in-one automated telescope/camera units such as the ZWO SeeStar S50 or the Dwarf Labs scopes are amazing — for a few hundred dollars, they can distill the whole experience to (1) Put unit on tripod (2) Use app (3) Collect amazing photos. Their capabilities are limited compared to traditional setups, true, but a lot of people will never get to those limits. You can spend more and do worse.
“Traditional” Deep Sky
Most targets demand some kind of tracking mount that can compensate for the Earth’s rotation. Here is where many beginners go astray. They’re ensorceled by telescope specs, thinking that they need a big lens/mirror on a telescope with lots of magnification. When you’re learning, that’s exactly wrong. Bigger just means “harder to debug”.
What’s critically important is the mount. Don’t buy a telescope, buy a mount and then choose optics to put on it. “I started with too big a telescope” is a common admission. but “too good a mount” — never. (Too heavy, yes. Too good, no.) My cell phone home screen is a deep-sky image I produced with my 11-year-old DSLR and a forty-year-old 50mm macro lens…riding on a $2500 mount!
Examples here are from one manufacturer’s product line. That’s just for simplicity, they’re hardly the only fish in the pond.
For a camera and lens, or a mini refractor telescope, a star tracker such as the iOptron SkyTracker will do the job for under $600. The next jump up is a small equatorial mount with GOTO, or the ability to slew right to your target. You can put a longer scope on it, and take longer exposures. Ones like the CEM26 that can support up to, say, a 3” refractor and camera will set you back at least a grand. If you have a bit more to spend, consider one of the newer strain-wave mounts, which are very light for their capacity and simpler to set up. Finally, if you’re rolling in the dough (or, like me, in the grip of madness), a higher-capacity mount like the CEM70 is very rewarding to work with. Note that most of these prices don’t include tripods, and an astro mount needs a really beefy one. I’ve tried my CEM25P on my camera tripod and it just laughed. Then it fell over.
As for a telescope, a small refractor (50-80mm diameter lens) is the smart choice. Light, simple, robust, very little that can go wrong with it. Bigger or more complex scopes just make debugging more complicated. Sorry, there will be debugging. Remember, I warned you.
Planets
You know all that advice I just gave about deep-sky gear? Yeah, throw that away. Planets are very tiny targets but they’re brilliantly lit, standing the deep-sky challenge on its head. For planets you need a big scope (bigger objective lens/mirror means more resolvable detail), a lot of magnification, and a camera with small pixels that can shoot video at high frame rates (up to 150 FPS). Here, just buying a computerized scope is great.

Okay, you got me. None of these telescopes are suitable for imaging — they’re all Dobsonian visual scopes.But they’re SO COOL! (Photo by Vivian Morrison, Madison Astronomical Society)

Automated telescope
(ZWO SeeStar S50)
Star Tracker (iOptron SkyTracker Pro)

Budget GOTO Equatorial mount (iOptron CEM26)
Strainwave Mount (iOptron HAE-29)
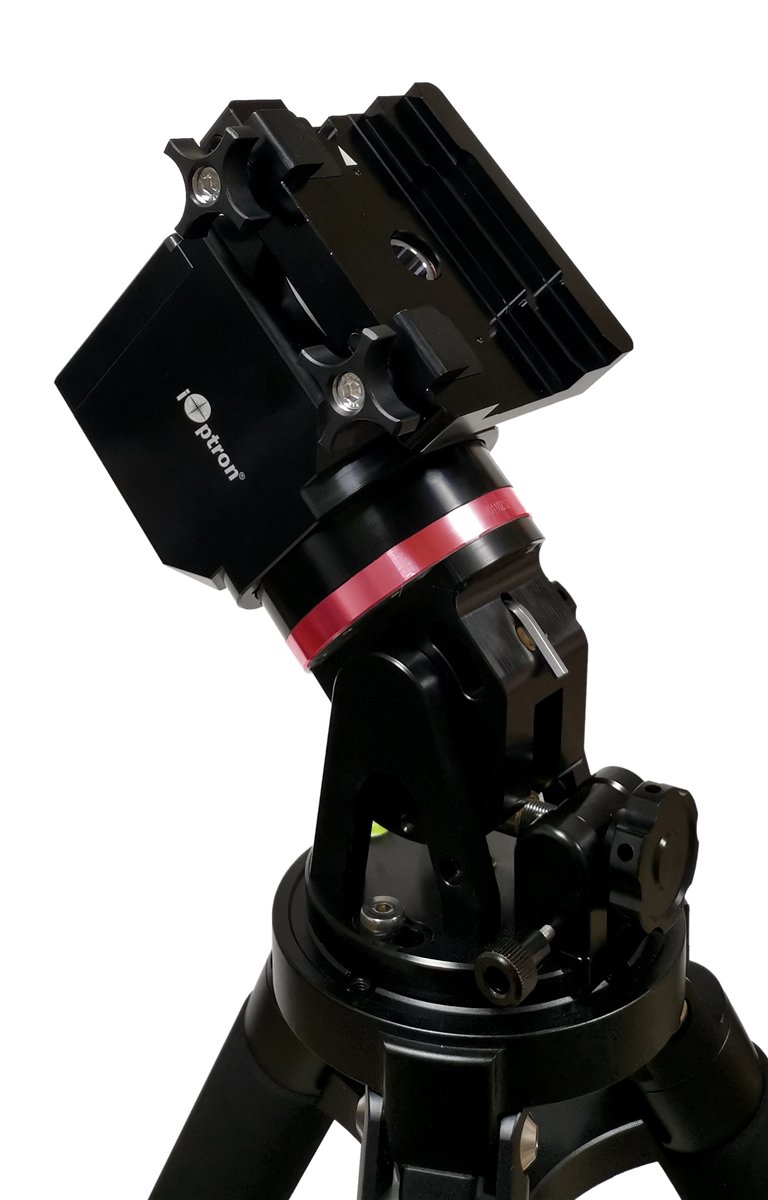
70-pound capacity Equatorial Mount (my very own iOptron CEM70)

Detailed Tutorials
Milky Way
I learned the craft largely from Lonely Speck’s Astrophotography 101 series, and I highly recommend the site — so much so, that I feel no need to try and replicate it here!
Deep Sky
Charles Bracken is a great guy — I’ve corresponded with him — a superb astrophotographer, and a clear and compelling writer. I’ve long since lost track of how many times I’ve recommended his book The Deep Sky Imaging Primer, because it’s simply the best. He lucidly explains crucial fundamental concepts like how sensors work and where image noise comes from, before giving detailed guidance on everything from choosing equipment, to taking your pictures (the term of art in the community is “acquiring data”, BTW), to processing them. I still go back and reread Charlie.
My other suggestions are to find and join a local astronomy club, if you can, and to sign up with Cloudy Nights. You can access more expertise on those fora than you could shake a counterweight bar at. The Beginning Deep-Sky Imaging forum is where I mostly hang out.
Planets
I’m no expert planetary imaging. I do know you should turn all the advice I just gave you about deep sky right on its head. Mount? Hah! Who cares! Scope? Bigger aperture is better, longer focal length is better, we’ll pile on magnifying lenses till we hit f/20 or so! Then we’ll shoot a minute or two of video at a tiny, tiny resolution like 640x480. Let the software pick out the few frames where the atmosphere didn’t screw it up. A whole ‘nother world! (Ow. Pun unintended. Honest.)
Just about everything I know about planetary imaging, I learned from Cloudy Nights. The Major and Minor Planetary Imaging forum has a FAQ that is an amazeballs tutorial all in itself.
Software: Previsualization and Planning
Stellarium is sophisticated yet easy-to-use free planetarium software that can replicate the sky so you can see what will be where when. PC, Mac, phones too. You can easily configure it to show the exact view of a target with a given camera and scope (or camera lens). Invaluable for planning.
PhotoPills is a terrific little app for planning landscape work. It will display a map and show you the exact sightlines to astronomical objects of interest (e.g. Moon, Milky Way galactic center) at a given point in time. Want to image the Milky Way arcing out from a rock formation? PhotoPills will let you plan that. Stuffed with other great tools, too.
Software: Image Acquisition
You really don’t need computer control to start, just some means of triggering your camera remotely, and, ideally, of sequencing multiple images. Once you have a scope, a GOTO mount, and maybe want autoguiding, then you’ll want NINA (for Windows) or KStars/Ekos, which is what I use on my scope-mounted Raspberry Pi. They’re both open-source. I bought a prepacked version of KStar/Ekos called StellarMate OS which I highly recommend, I’ve recouped the $50 cost many times in personal support alone. (What about the ASIAir series?)
Software: Processing
For deep sky, there are free tools like Siril but I really recommend Astro Pixel Processor to everyone, it’s what I use and it provides a great path from “push button to make astrophoto” all the way up to what I do. It’s not the very most powerful astro software, but it balances ease of learning, ease of use, and result quality very well indeed.
For planets, FireCapture for data acquisition, and AutoStakkert! for processing is what I know. And maybe some wavelet sharpening tools that I really need to spend more time on (viz. any of my planet photos!).